I am not a huge Christmas fan. That's not totally true. I love parts of the holiday season. I love the baking and the crafting and the holiday special watching. I love the thinking about others, giving to those in need and spending time with the people we love.
Over the Thanksgiving break, the kids and I got a headstart on our Christmas crafting. This week's Pinterest Challenge* highlights that my kids aren't posers either.
Together we made some really cute ornaments for our tree and to give as gifts.

I dumped regular old glue in a plastic bowl and Wade used a paintbrush to paint the glue on the letters.
Lucy sprinkled glitter on the letters after they had been painted with glue.

An important step we missed was punching holes in the letters before the glue paint and glitter. Ours worked out after, but I think it would have been better looking and easier to do the holes before.

Let the letters dry and then insert string in the holes and tie however you want. Then hang on your own Christmas tree or give one away as a small gift or tied to the present's gift tag.
This project cost me zero dollars because we had all of the supplies in our craft cabinet. I love projects that cost me zero dollars. Merry Christmas indeed.

I loved the simplicity of these sweet clay ornaments that I pinned from this site. Not wanting to buy clay, I searched for recipes for homemade clay that you can bake. I found some good ones and then just made it my own and made it gluten free!
Homemade Gluten Free Clay Recipe:
2 cups of gluten free flour
1 cup of salt
2 Tbsp. of vegetable oil
1 cup of water
Directions:
Mix the flour and salt together.
Add the oil and then slowly add the water until it forms a clay consistency.
(some sites suggested brushing egg yolk on the shapes before baking, we didn't do that for this project)
After making our clay, we rolled it out like we were baking cookies. Wade actually tried a small piece and spit it out promptly, um did you see how much salt is in that clay?
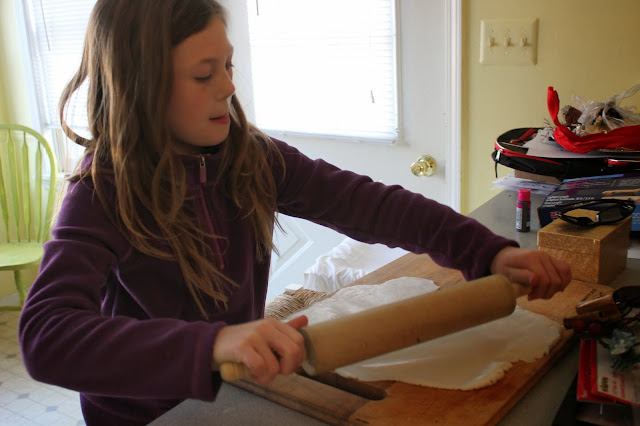 We rolled our claydough out flat until it was about 1/4 of an inch thick. To make the ornaments, the thinner the better as they tend to puff up a bit in the oven.
We used our Christmas cookie cutters to make shapes for our ornaments. We chose stars and trees.
 Then using an old paint brush we poked holes in the tops for the ribbon.

The web site that I pinned used a stamp for the lettering and I highly recommend that. I will be doing that next time. But for this project, I used an old pencil (w/out lead) to write the words.


We put the ornaments on a cookie sheet and baked them in a 250 degree oven for well over an hour. We originally baked them for about 20 minutes, but this was not long enough. Again, I warn against ornaments that are too thick because they do puff up a little and can get cracked while baking.
If you want you can paint them after they've cooled. We decided to leave them mostly plain and simple.

We tied a ribbon through and cut a small sprig off of our Christmas tree for a little flair.
This was another project that cost me zero dollars and I love how they turned out. Now I am really feeling holly, jolly.
Have you made anything on Pinterest lately? Any holiday projects? Share what worked and what didn't, leave a comment here or on my Facebook page.
Come on over and follow my Pinterest boards too.


Seven Layer Dip in Individual Cups (my favorite so far!)-click here
The pumpkin address-click here
The Kitchen Dancing Sign--click here
Over the Thanksgiving break, the kids and I got a headstart on our Christmas crafting. This week's Pinterest Challenge* highlights that my kids aren't posers either.
Together we made some really cute ornaments for our tree and to give as gifts.
*In an attempt at not being a Pinterest Poser,** every week I detail a new Pinterest challenge whether it be a new recipe or a craft.
**My definition of a Pinterest Poser is someone who is all pins and no substance.**

This project was really easy. We grabbed extra boxes we had in the basement, drew letters we wanted and then started cutting.
 |
| The festive snowman scissors were pure coincidence. |
 |
| Costumes while crafting are optional, Wade just loves to be Buzz Lightyear. |

An important step we missed was punching holes in the letters before the glue paint and glitter. Ours worked out after, but I think it would have been better looking and easier to do the holes before.

Let the letters dry and then insert string in the holes and tie however you want. Then hang on your own Christmas tree or give one away as a small gift or tied to the present's gift tag.
This project cost me zero dollars because we had all of the supplies in our craft cabinet. I love projects that cost me zero dollars. Merry Christmas indeed.

I loved the simplicity of these sweet clay ornaments that I pinned from this site. Not wanting to buy clay, I searched for recipes for homemade clay that you can bake. I found some good ones and then just made it my own and made it gluten free!
Homemade Gluten Free Clay Recipe:
2 cups of gluten free flour
1 cup of salt
2 Tbsp. of vegetable oil
1 cup of water
Directions:
Mix the flour and salt together.
Add the oil and then slowly add the water until it forms a clay consistency.
(some sites suggested brushing egg yolk on the shapes before baking, we didn't do that for this project)
After making our clay, we rolled it out like we were baking cookies. Wade actually tried a small piece and spit it out promptly, um did you see how much salt is in that clay?

We used our Christmas cookie cutters to make shapes for our ornaments. We chose stars and trees.


The web site that I pinned used a stamp for the lettering and I highly recommend that. I will be doing that next time. But for this project, I used an old pencil (w/out lead) to write the words.


We put the ornaments on a cookie sheet and baked them in a 250 degree oven for well over an hour. We originally baked them for about 20 minutes, but this was not long enough. Again, I warn against ornaments that are too thick because they do puff up a little and can get cracked while baking.
If you want you can paint them after they've cooled. We decided to leave them mostly plain and simple.

We tied a ribbon through and cut a small sprig off of our Christmas tree for a little flair.
 |
| We did outline JOY on a few of them. The artistic idea goes to Tim who had the idea. I love the way they turned out too. |
This was another project that cost me zero dollars and I love how they turned out. Now I am really feeling holly, jolly.
Have you made anything on Pinterest lately? Any holiday projects? Share what worked and what didn't, leave a comment here or on my Facebook page.
Come on over and follow my Pinterest boards too.

Here are some of the projects I've already attempted, the good and the bad:

Make Your Own Stamps- click here
Birthday Shirt- click here
Gluten Free Pop Tarts- click here
Front Porch Kid Art Display- click here
Door turned into Table- click here
Birthday Shirt- click here
Gluten Free Pop Tarts- click here
Front Porch Kid Art Display- click here
Door turned into Table- click here
Summer Wish List Chalkboard-click here
Peanut Butter Nutella Cookie Sandwiches-click here
Painted Mason Jar Vases-click here
Cinco de Mayo Paper Flowers- click here
Earth Day Cupcakes- Click here
Nail Art-click here
Homemade Photo Booth Fun- click here
Fake Bangs- click here
DIY Subway Art- click here
Furniture Painting and Bench/Chest Makeover- click here
Thanksgiving-y Project/Gratitude/Holiday Countdown- click here
The Smoothie-click here
The Smoothie-click here
The Free Printable Turned Artwork in a Boring Hallway- click here
The chalk board-click hereSeven Layer Dip in Individual Cups (my favorite so far!)-click here
The pumpkin address-click here
The Kitchen Dancing Sign--click here
Come play with me on Instagram @jumpingwithmyfingerscrossed.
Oh yeah, and come follow me on Twitter @AngelaYBlood and subscribe to my MomPulse YouTube channel here.
I love both ideas, especially since they're both easy.
ReplyDeleteThe homemade clay ornament is super cute!